Bathroom Grab Rails Explained: Where They Should Go (And Why UK Building Regs Matter)
Most people fitting bathroom grab rails do it by eye.
It seems reasonable – put the rail where the hand naturally lands. Measure roughly. Fix it to the wall. Job done.
But spend any time reviewing what actually happens after those rails go up, and a pattern emerges. The rail sits too high for pushing up from the toilet seat. It’s too far from the bath edge to help during a real transfer. Or it’s fixed into plasterboard that can’t take a sudden load when someone stumbles.
Here’s the thing. A badly placed grab rail isn’t just unhelpful – it can be actively dangerous. It creates a false sense of security. And a fall where someone trusted a rail that wasn’t up to the task is often worse than a fall where no rail was present at all. Occupational therapists see this pattern regularly, and it’s one of the first things a competent OT assessment will flag.
This article explains what UK bathroom grab rail regulations actually require, why the difference between horizontal and vertical rails matters more than most people realise, and how the right accessible bathing products can do much of the positioning work before installation even begins.
Why Grab Rail Position Matters More Than Grab Rail Quality
You can buy the most robust stainless steel rail on the market. If it’s in the wrong place, it won’t help.
That sounds obvious, but it’s the single most common mistake – and it’s made by DIYers, handymen, and even some council-contracted installers. Rails get positioned where they “look right” rather than where they support the actual movement the user needs to make.
Standing up from a toilet is a fundamentally different action to stepping into a shower. One requires a horizontal push. The other requires a vertical pull. A rail that works for one may be useless – or worse – for the other.
But what about fixing method?
Position is only half the story. A grab rail fixed into plasterboard alone cannot support the sudden force of a stumble or fall. Think of it like hanging a heavy painting on a plaster wall without finding the stud – it holds fine until it doesn’t. Part M guidance and occupational therapists consistently recommend fixing into timber studs, masonry, or plywood noggins behind the board. Without that structural backing, even a perfectly positioned rail becomes a liability.
This is one reason why products with built-in grab rails offer a fundamentally different level of reliability. Most Vidalux walk-in baths include solid, integrated rails – positioned along the longest edge of the bath, against the wall side. That’s the edge where the user has the least ability to grip the bath rim for leverage, making it the most useful location for a fixed rail.
Horizontal, Vertical, or Diagonal – What Each Rail Type Actually Does
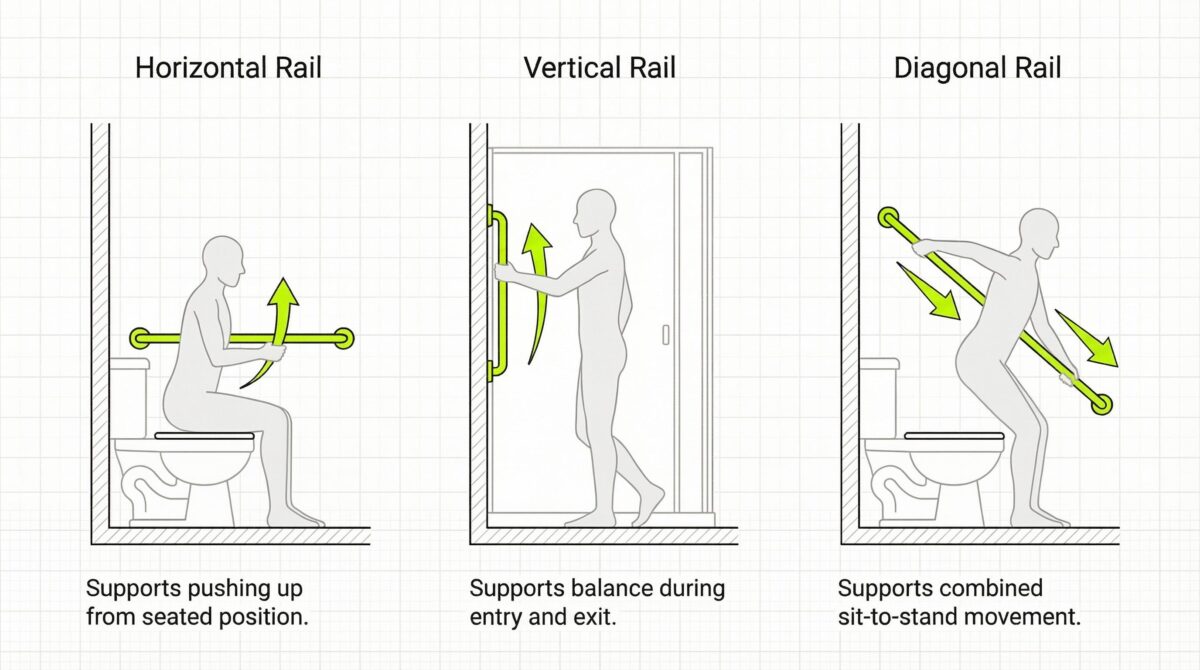
The assumption that horizontal rails are always the safest choice is one of the most persistent myths in accessible bathroom design.
Each orientation serves a different biomechanical purpose, and getting this wrong means the rail supports the wrong movement entirely.
Horizontal rails are most effective for pushing up from a seated position. They allow the user to shift their weight laterally and press upward – exactly the motion needed when rising from a toilet, bath seat, or shower chair.
Vertical rails serve a different purpose. They’re designed for pulling up from a standing position and for steadying balance during entry and exit – stepping through a shower door, for instance, or moving through a walk-in bath doorway.
Diagonal rails blend both actions. Positioned beside a toilet, a diagonal rail lets the user push, pull, and transition smoothly through the full sit-to-stand movement. L-shaped rails combine both orientations in a single fitting, which is why occupational therapists often recommend them for toilet-adjacent placement.
So which is “best”?
There isn’t a universal answer. The right rail type depends entirely on where it’s placed and what task it supports. A vertical rail beside a walk-in bath door makes sense – the user needs to steady themselves while stepping through. A horizontal rail along the bath’s perimeter supports lowering into and standing from the seat. Both are correct. Neither replaces the other.
What Part M and Doc M Actually Say About Grab Rail Placement
Part M of the UK Building Regulations – specifically Volume 2, supported by BS 8300 – is the standard that governs accessible bathroom design. Doc M provides the detailed diagrams that councils, housing associations, and occupational therapists reference when specifying layouts. The Planning Portal publishes Part M guidance that anyone specifying or retrofitting accessible bathrooms can consult directly.
One common misconception is that these standards only apply to new builds. They don’t. Doc M diagrams are routinely used as the benchmark for retrofit adaptations, housing-association modifications, and OT-assessed bathroom schemes – even in older properties.
Here’s what the guidance typically recommends for grab rail placement:
Near toilets: horizontal rails at approximately 680-750mm above finished floor level. Drop-down rails positioned around 600-750mm from the centre of the toilet. These heights aren’t arbitrary – they’re based on the biomechanics of how most adults transfer from seated to standing.
Bath and shower areas: horizontal rails alongside accessible baths typically sit between 680-1180mm above the floor, depending on whether the user is seated or standing during use. Wall clearance of 50-60mm is recommended to allow a secure grip without trapping knuckles.
Shower entry: vertical rails from approximately 800-1200mm above the shower floor, creating what the guidance calls a “system of support” for stepping in and out.
Rail lengths: Part M-linked diagrams emphasise minimum lengths of 750mm or more for toilet-adjacent rails. Short “token” bars that don’t provide continuous support through the full movement are a common inspection failure.
Worth noting: these measurements are from published guidance, not installation instructions. Your installer or occupational therapist will confirm the correct layout for your specific bathroom dimensions and the user’s individual needs.
Common Mistakes That Fail Inspections (And Put People at Risk)
The same errors appear again and again – in OT assessments, Part M inspections, and in cases reviewed after a fall.
Rails fixed into plasterboard without backing. This is the most dangerous mistake. Plasterboard cannot support fall-load forces. When someone grabs a rail mid-stumble, the force can be several times their body weight. Without timber noggins, plywood backing, or masonry behind the board, the rail will flex or pull free. What felt solid during normal use can fail completely under sudden load – and the difference between those two conditions is exactly the moment when a grab rail matters most.
Rails at “aesthetic” heights. Positioned where they look tidy on the wall rather than where they match the user’s functional movement. A rail at elbow height may look balanced, but if the user needs to push up from a seated position, it’s the wrong height entirely.
Token-length rails. Short bars that don’t extend through the full range of motion. If a rail ends before the user completes their transfer, they lose support at the most critical moment – mid-movement, partially standing, weight committed.
Missing rails at key transfer points. A bathroom might have a rail beside the toilet but nothing at the bath entry, or a rail inside the shower but nothing at the threshold. Accessible bathing requires a connected system of support, not isolated grab points.
Products designed with safety as a first principle can eliminate several of these risks before the installer even arrives. Most Vidalux walk-in baths include solid, integrated grab rails – positioned where they’re most useful, along the wall-side edge where the user has the least natural leverage. The bath’s low step-in threshold, wide access door, slip-resistant base, and built-in seat all work alongside those rails. It’s not a single feature solving a single problem – it’s a considered approach to safe, dignified bathing.
How Walk-In Baths With Built-In Rails Simplify the Whole Process
The challenge with grab rails isn’t just getting the height right. It’s coordinating position, fixing strength, orientation, and task-matching across every transfer point in the bathroom.
Walk-in baths that include integrated rails remove a significant portion of that guesswork. Most Vidalux walk-in baths have grab rails built in – solid, reliable, and positioned in the most useful locations for the user.
Combined with an easy-grip door handle designed for all abilities, a built-in seat with height optimised for stable transfers, and high-grip internal surfaces, the rails become one element in a complete safety approach – each part designed to support the next.
Does that mean you don’t need wall-mounted rails?
Not necessarily. Built-in bath rails cover the bathing zone. But additional wall-mounted rails – beside the toilet, at the bathroom entrance, along a corridor – should still follow Part M guidance and be installed by a competent tradesperson. The built-in rails handle the hardest part. Your installer handles the rest.
See the full range of Vidalux walk-in baths.
Getting It Right
Grab rail placement isn’t guesswork, and it isn’t decoration. There’s a clear logic behind every height, angle, and fixing point – and Part M exists to codify it.
A good occupational therapist or experienced installer will apply that logic to your specific bathroom. The right product helps too. When grab rails are already built into the bath – solid, well-positioned, and ready to use – half the work is done before installation begins.
Review the options. Compare the details. See how we support safer bathing.
Frequently Asked Questions
Q: What height should bathroom grab rails be in the UK?
Bathroom grab rail height in the UK is guided by Part M and BS 8300. Horizontal rails near toilets are typically recommended at approximately 680-750mm above finished floor level, with shower-entry vertical rails at around 800-1200mm above the shower floor. These heights are based on the biomechanics of common transfer movements, not aesthetic preference.
Q: Do grab rails need to comply with building regulations?
Grab rails in accessible bathrooms should align with Part M (Doc M) guidance. While adding rails to an existing home may not always trigger a formal building-control inspection, councils and occupational therapists routinely reference Doc M standards for correct placement and fixing.
Q: Where should grab rails be placed near a toilet in the UK?
Grab rails near a toilet should support the sit-to-stand transfer. Part M guidance typically recommends a horizontal or diagonal rail beside the toilet at 680-750mm above floor level, with drop-down rails positioned approximately 600-750mm from the toilet centre.
Q: Are horizontal or vertical grab rails better?
Horizontal and vertical grab rails serve different purposes. Horizontal rails support pushing up from a seated position, while vertical rails assist with balance during standing and entry. A diagonal or L-shaped rail beside the toilet can effectively support both movements.
Q: Does Part M apply to existing bathrooms or only new builds?
Part M is legally required for new-build accessible bathrooms, but its principles are widely applied to retrofits and adaptations. Councils, housing associations, and occupational therapists regularly reference Doc M diagrams when specifying grab rail layouts in existing properties.
Q: Can grab rails be fixed to plasterboard?
Grab rails should not be fixed to plasterboard alone, as it cannot support the sudden load of a fall. Correct installation requires fixing into timber studs, masonry, or plywood backing behind the plasterboard – always carried out by a competent installer.
Q: Do grab rails need to be installed by a professional?
For accessible bathrooms, yes – grab rail installation should be carried out by a competent tradesperson who can confirm the correct fixing method for your wall type. Incorrect fixing is one of the most common and serious failures in accessible bathroom installations. Your occupational therapist can advise on placement; your installer confirms the fixing.
- About the Author
- UK’s best-rated?

With over 22 years in the home spa industry, Andrew has overseen every stage of the journey—from initial product design and manufacturing to final installation. An author of multiple technical publications and scientific papers, he founded Vidalux to replace industry hype with engineering-led reliability. His focus remains on delivering gym-quality wellness through honest design and technical truth.
DISCLAIMER: All specifications, claims, and advice relating to any internal or external procedure, practise, product, or service were true at the time of writing. For more accurate and up-to-date details in relation to Vidalux services, please visit the relevant dedicated on-site page. For any product-related information, specifications, or guidance, the information on the product page should be considered the governing source.